The Yurt Part 3
In The Yurt Part 1 and The Yurt Part 2 we cataloged our efforts at moving the small 16’ yurt off the original platform onto a new platform.
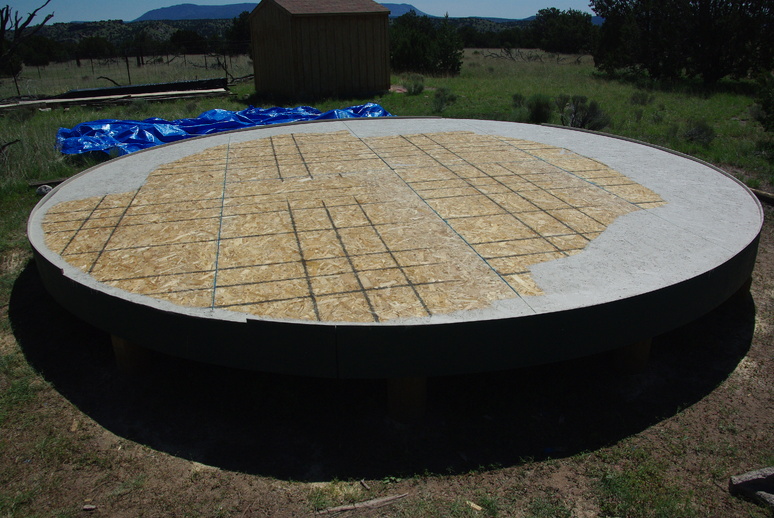
After acquiring more paint for the floor, we now have the new platform and floor ready to receive the reassembly. Lord Willing everything will go well without damage to the yurt or injury to us!
After disassembling the yurt and storing the parts for a day, we are now ready to reassemble it in its new location. The first step was placing the two door frames and screwing them down to the floor. Next, the wall lattice is stretched out and fastened loosely to the door frame carriage bolts. Then, it’s on to the outside, where the brackets at the bottom of the lattice walls are rotated down over the drip edge to hold the walls against the outer edge. This is done for each piece of wall lattice. The cable is then placed in the little Y formed by the top of each lattice junction.
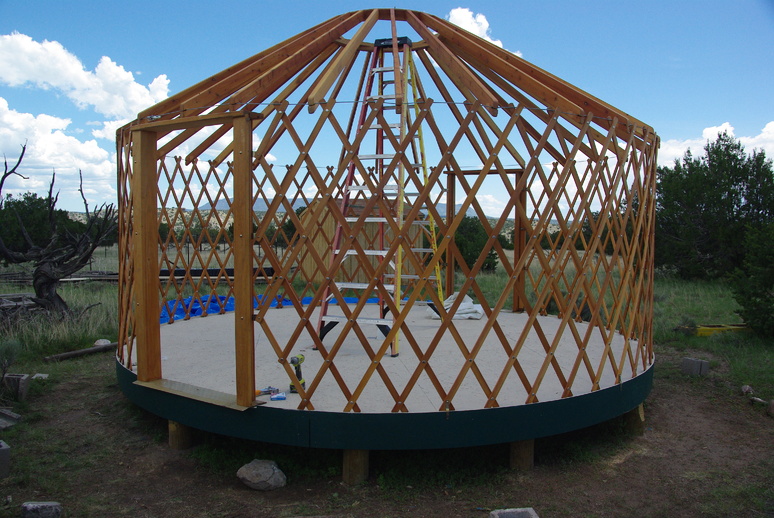
The rafters are installed by starting with three spaced equally around the center ring at about 120 degrees. After placing two, the third is used to hoist the center ring up, then that rafter is hooked over the cable. This operation should be considered a HARD HAT area during rafter installation, as the center ring could fall. What we did was place the center ring at the top of a ladder with rope and two boards holding it in place while the rafters were hoisted. Then we placed the rafters, keeping the spacing symmetrical for balance, until all were installed in the center ring and hooked over the cable.
For safety, each rafter then had a screw placed on the outboard end, across the cable slot to prevent the rafter from lifting from the cable. Another cable was threaded through each rafter near the upper end to ensure the rafters couldn’t slide out of the center ring during high winds.
The fun part begins now, where the roof coverings are installed. You really must have calm conditions for these steps. Firstly, the inner cover is installed over the top and securely stapled to the end of each rafter, after insuring the rafters are equally spaced.1 We then had to re-tape the insulation segments with duct tape as the joints had come apart during removal. The insulation was threaded up through the center opening and spread out over the top, with a few staples in the ends to hold it in position.
The really difficult part was installing the roof covering, as the premium cover is especially heavy (and bulky). But, thank the Lord, we managed to hoist it up through the center and install it. The method is to fold the cover (on the ground) in half so the underside is outward. Then it can be folded like a pizza’s slices. When hoisted atop the roof, with the outer edge raised first, it can then be unfolded to cover half the roof. Next, the folded half is pulled over the center opening (and over your head) to cover the remaining half of the roof. It may be necessary to use baby powder on the insulation to assist in sliding the cover into position, where the door’s rain diverters are positioned correctly, and the oval grommets align with the twist-lock connectors. This step is made much easier with several folks assisting from the ground to both rotate and unfold the cover. We did not have that luxury, as I and my lovely wife were the only ones available. So the bottom line is just we two assembled the whole yurt.2 We had to ensure that once we started, we finished the entire outer structure, as the floor would not be protected from possible rain without the top and walls completed.
We installed new parachute cord, both for the inside valence and outer roof cover tie-downs. For the walls, the insulation3 is placed under the inner roof cover and hung from the steel cable with cable ties through the grommets (and left loose for final positioning). After the outer walls are hung, the insulation will be moved to align with the window openings. Then the cable ties are tightened.
Next, the outer wall covering was hung. This was assisted by flipping up the roof top cover valance to access the inner valance cord, where the wall clips onto the cord by simply twisting the clip 90 degrees to the left, and slipping it onto the cord and twisting it back into position making sure the cord “snaps” into the clip on both sides. We then slipped the wall end boards into the space behind the door clamps and tightened the wing nuts securely. One end of each wall has extra material which is folded under after the wall is pulled tight. Then the other wall board is placed at the fold and clamped into the other door, behind the wing nuts. The cord supporting the wall was pulled tight to give consistent support all around the walls. After everything was adjusted, all cable ties were pulled tight and trimmed, and the outer roof valence cord secured to the eye bolts at each side of the doors and snugged up.

The next day, we installed the snow load supports, each one under the outer end of each rafter, and pushed against the walls. These are screwed to the rafter ends and to the floor. As the rafters, when reinstalled, were in different locations, we did not attempt to screw the snow load supports (from the outside) through the lattice walls. This would require drilling more holes through the lattice walls. Plus, we needed to get the outer coverings on in case of rain!
Finally, we re-installed the door and screen in the frame. We may have to make another door for the other opening, as only one door was originally purchased. It’s unlikely we would find a door ready-made as the height is non-standard. We will look into a door of the right width that can be trimmed for height. And that’s about it for this yurt adventure. Some work remains as steps are needed for each entry, but we can do that at our leisure. Look at The Yurt Part 4 for more of the story.
We thank the Lord Jesus for giving us the strength, stamina and good weather to re-assemble the yurt. God bless you and yours. Stay safe.