The Yurt Part 1
We have finally arrived at the point where we are starting to rebuild the small yurt on a stronger base. The original deck where we built the 16’ and 30’ yurts has deteriorated to the point where we are not sure how much longer it will be before it collapses! Don’t think it will last through another rainy season.
The small yurt we are keeping, perhaps as a guest room. The larger 30’ yurt we sold. So, depending on acquiring the materials we need (4x6 beams, etc.), we will create a new support and floor for the 16’ yurt. With that in mind, we dug the holes, lots of holes!
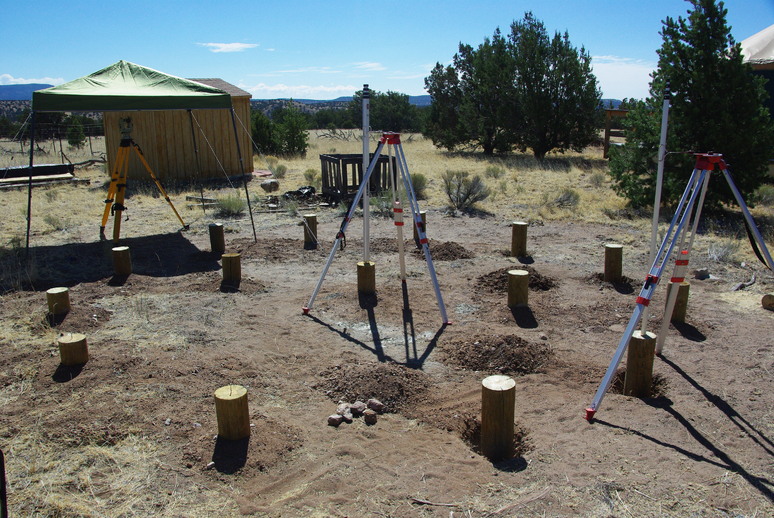
All the support poles are sections of 6-8 inch electric poles, pressure treated for ground contact. We first started with the center pole, where we dug down at least 18 inches to get below the frost line for this region. However, this hole is about 24 inches deep, as it is also the tie-down point for the yurt. As we wanted the floor to be ~10 inches above the ground all around, we cut the pole accordingly. This pole is now the reference point for all the other poles. As seen below, setting up a theodolite (transit) to measure the height, we could then determine each pole’s required length, regardless of the hole depth. This would ensure all poles would be level with the center and each other.

Notice the theodolite (a Pentax TH10) is set up under a canopy. This is an important step for sunny days! If the sun shines on the transit, the level bubbles have a tendency to move toward the hot end of the level, making it very difficult to level the instrument with any accuracy, or keeping it accurate for any length of time!
We set up a level rod on the center post and take a reading to determine the relative height. I say relative because each time the transit is set up, the reading will be different. And that’s okay because each setup for each day requires establishing a new height. However, regardless of the actual reading on the theodolite, the post height is the same.
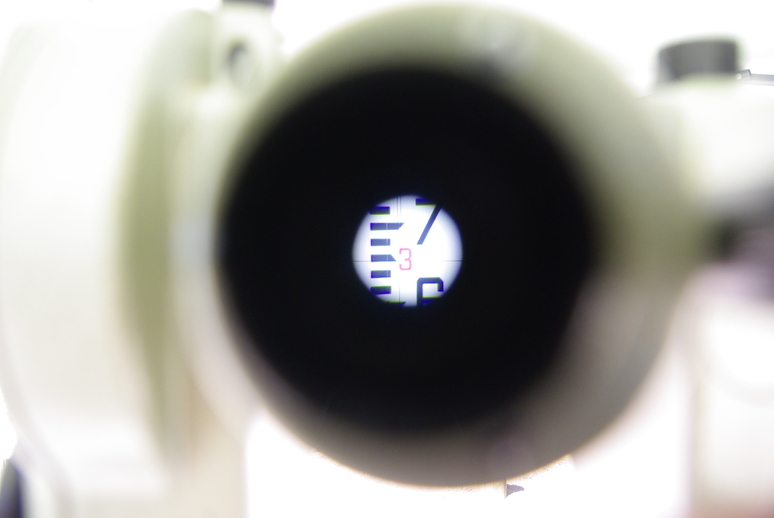
As the above image shows, a reading of 3.65 feet is obtained. So for example, if a reading of 5.975 were seen on the further level rod shown in the previous image, by subtracting, \(\frac{5.975}{3.65} = 2.325\), a pole is cut to that length. As a further step and gross error check, the pole is placed in its hole, the level rod is placed on top, another reading is taken, which should indicate 3.65. If the reading is different, a bit of dirt is added or subtracted. So the depth of the hole is not important, as the top of the pole will be at the same level as the reference pole.
A perceptive reader will notice all the reference readings are in feet, tenths, hundredths and thousandths of a foot. This is because most range poles/level poles are marked in tenths/hundredths/thousandths, requiring no conversions. However, it is most advantageous if you also have a tape measure marked in the same units. If not, the number must be converted to fractions of an inch (4ths, 16ths, 32nds, etc.) for cutting, adding another opportunity for errors to be made. As one thousandth of a foot is less than 1/64”, that’s plenty of accuracy for most anything.
As an example, the above number (2.325’) can be converted as so: 0.325×12=3.9,0.9×32=28.8, giving 2’ 3 and 29/32”. A bit cumbersome, at the least!

The yurt to the left in the above image is the one to be transplanted. The connecting hallway is already removed. Also seen, all the poles are cut and awaiting concrete to fill the holes and stabilize the posts. The last image shows all completed poles in place, the site cleaned up and all the instruments/tools put away.

The next installment will continue this project. We’ll see how far that goes…
That’s it for this time. We praise God for giving us guidance in this and all things! Have a great day and stay safe!