showmenu();
  int choice;
  cin >> choice;
  while(choice != 9) {
    switch(choice) {
      case 1  :   registers();
                  break;
      case 2  :   frequency();
                  break;
      case 3  :   tx_power();
                  break;
      case 4  :   //build a packet to send
                  build_packet(destination,sender,identifier,flags);
                  break;
      case 5  :   printf("%c%c%c%c\n",0x1B,0x5B,0x32,0x4A); // clear screen
                  break;
      case 6  :   {/* variables with an initializer need to be isolated in a block to be out of scope
                   for any subsequent initializations */
                  uint8_t val = 0;
                  while(!val) {
                    val = receive(); // should return on 'packet_ready' val in function
                    // 1st byte of received packet (variable length) is Fifo length
                    cout << "RSSI: " << rssi() << endl;
                  }
                  set_mode(STANDBY_MODE);
                  cout << endl; }
                  break;
      case 7  :   test_xmtr();
                  break;
      case 8  :   cout << "\nDestination(1-9): ";
                  cin >> dst;
                  destination = dst;
                  break;
      default :   cout << "That's not a choice\n\n";
                  break;
      }
      showmenu();
      cin >> choice;
    }
cout << "\nHave a great day. Bye!\n" << endl;Pico & RFM69HCW Packet Transceiver Part 2
electronics
pico
This is part 2 and a continuation of Pico & RFM69HCW Packet Transceiver Part 1.
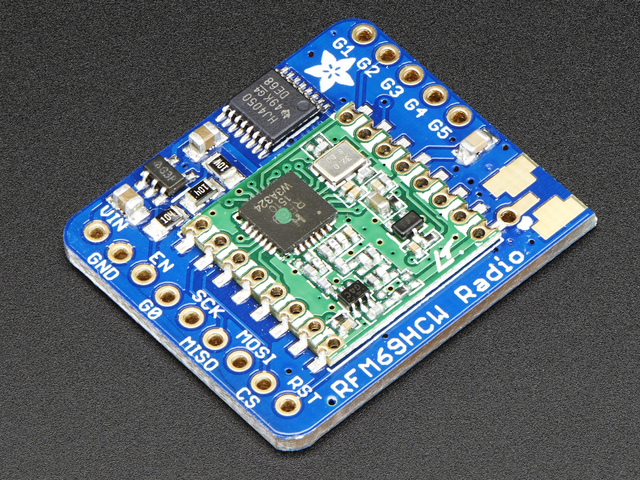
This post will start with the switch/case structure I am currently using for the program to exercise the RFM69HCW packet transceiver from AdaFruit.
Notice case 6 (receive), where the offending line requiring isolation from the other case statements, is uint8_t val = 0;. This particular variable is used to return from a packet_sent interrupt when a packet has been sent, and also return from payload_ready during receive. Notice the curly braces around the statements (except the break; statement). Case 4 (send) was the other great offender in an earlier iteration of the program. Those statements were moved into a function, which was also the function with the getline issue mentioned in part 1.1 It also took a bit of time to discover the correct order for the header bytes. The destination is first, otherwise the receiver doesn’t recognize the packet as being addressed to it. Also, for variable-length packets, the first payload byte sent must be the payload length. This is because the receiver strips the first FIFO2 byte to mean the packet length. Then it retrieves the rest of the payload from the FIFO.
Big Oops: I forgot to mention in the first post the reason for this entire effort. It seems all the libraries I mentioned in the first post revolve around an installed code base for Arduino. I don’t own any Arduino boards. In the beginning I attempted to use arduino_compat libraries, but each library asked for additional libraries, and those asked for more libraries. Finally I tired of trying to find compatible libraries, and deleted the whole batch. Admittedly, there are a giant number of Arduino users and developers, but I prefer straight C++ code. Years ago, I ran into the same problem when I was heavily into Atmega chips, everything was Arduino-based. So then, as now, I had to create from scratch. However, the up side to all this, is I get to learn new and interesting ways to C++!
I most likely have created more functions than necessary. I’m sure some could be slimmed down or combined into others, but, “It is what it is!” What I have now (shown from the header file) are these.
static void showmenu(); // show choices for main program
static void pico_rfm_interface(); // setup Pico board inputs/outputs/functions
static inline void manual_reset(); // RFM69HCW, Ver 1.1, p. 76
static void registers(); // read most registers
static inline void cs_select(); // chip select active low
static inline void cs_deselect(); // chip de-select high
static void write_register(uint8_t reg, uint8_t data); // Write data to register
static void read_registers(uint8_t reg, uint8_t *buf, uint16_t len); // read selected registers
static uint8_t init(uint8_t sender); // initialize RFM69HCW
static int set_mode(uint8_t opMode); // set operating mode
static int set_encrypt_key(std::vector<uint8_t> encryption_key);
static float rssi();
static int tx_power();
static void frequency();
static void build_packet(uint8_t node,uint8_t destination,uint8_t identifier,uint8_t flags);
static int packet_sent();
static int payload_ready();
static int receive();
static vector<uint8_t> check_rxbuf();
static vector<uint8_t> hex2ascii(vector<uint8_t> payload);
static int test_xmtr();
There is a nice register configuration structure, which I modified from the LowPowerLabs libraries. It was a new concept for me, and an elegant way to initialize the RFM69HCW registers. The nice touch was having the init() loop recognize the last line {255,0} and break out, allowing the configuration parameter entries to be reduced or lengthened at will. I noticed the RadioHead libraries use the same structure, and as the concept is very efficient, I retained that functionality. I can think of other areas where a similar structure would be handy if lots of items needed setting.
Another area I found from the RFM69HCW datasheet was a power-on reset function which mentioned that all registers returned to factory values. While connected to the Pico, I noticed some registers were not being reset, hence the manual_reset function.
static inline void manual_reset() { // RFM69HCW Datasheet, Ver 1.1, p. 76
  asm volatile("nop \n nop \n nop");
  gpio_put(RESET_PIN, 1); // set high
  sleep_us(100); // keep high for 100 uS
  gpio_put(RESET_PIN, 0); // set low
  sleep_ms(5); // chip ready after 5 mS
}
You could say, “What’s the difference from Arduio, what with things like RESET_PIN, and others?” And that’s true, in some respects. What do those things look like? How about this, defined in the header file.
// user facing constants
#define SLEEP_MODE 0x00
#define STANDBY_MODE 0x04
#define FS_MODE 0x08
#define TX_MODE 0x0c
#define RX_MODE 0x10
#define WRITE_BIT 0x80 // wnr bit, 1 = write access
#define READ_BIT 0x7f // wnr bit, 0 = read access
#define RESET_PIN 22 // RST pin for RFM69HCW using Pico GPIO 22 (pin 29)
#define DIO0 21
#define DIO1 16
#define DIO2 17
#define DIO3 18
#define DIO4 19
#define DIO5 20
These describe Pico pins and ‘uint8_t’ values for RFM69HCW registers. Notice particularly the write and read bits for OR’ing with the register values to indicate a read or write operation. Also note when reading the FIFO register, whereas most register reads require two bytes, the FIFO only wants one. Otherwise, every other byte is skipped. I have lots of conversions for data display, and a bunch used during the testing process. This also requires a whole raft of C++ libraries in addition to the usual Pico-specific hardware libraries, added as I found the need.
 // Specify libraries and programs
#include <stdio.h>
#include "pico/stdlib.h"
#include "pico/binary_info.h"
#include <cstdint> // integer types definition,C++11
#include <iostream> // for user input/output
#include <cstring> // for text manipulation
#include "hardware/pio.h"
#include "hardware/gpio.h"
#include "hardware/spi.h"
#include "RFM69reg.h"
#include <vector> // manipulate vectors
#include <bitset> // show zeros and ones of variable
#include <iomanip> // show integer in hex
#define FXOSC 32000000 // crystal oscillator frequency
#define FSTEP (FXOSC / 524288) // frequency synthesizer step size
One area I have not explored yet is the acknowledge (ACK) functionality. At this point I am pleased to be able to transmit an encrypted packet, either a compiled message, or a new message, receive it on another radio, and see the signal (rssi) level. I’ve designed the test_xmtr function to transmit a series of 1/2 second pulses, easily seen on a spectrum analyzer, for checking power levels. This is using a simple 1/4 wave3 antenna made from a BNC jack with four ground radials directly soldered to it and bent down at a 45 degree angle, and tuned with a NanoVNA V2 Plus4 vector network analyzer. This places the antenna close to 50 \(\Omega\) impedance, with an SWR under 2:1.
So, that’s enough for this post. Future areas I wish to explore are making a remote weather station by adding a BME280 sensor module to the Pico and RFM69HCW, with perhaps a E-Ink readout for display. I am also wondering whether it may be useful to create a GitHub package for others who may be interested in pursuing a similar path. That would require some additional research on just how to do that. Sounds like fun!
That’s it! Have a blessed day!